Wednesday 5 June 2013

Sultan Lade Table

Materials: Sultan Lade Bed frame


Description: My wife and I had this crazy idea of making a table from these hand me down Sultan Lade. First step is to remove all staples and fabric supporting the frame. A leg was made from 2 wood slats, cut and connected together with screws and wood glue forming a narrow 70cm x 10cm rectangular frame. We made 4 sets of legs, 2 legs were connected by a full slat coming in between the leg frame, this will become the support of the table top made again from slats nailed and glued from the bottom

~ Marcus Isip, Dubai UAE

(Plant) Pot Lights


Materials: IKEA, SKURAR, Plant pot, off-white

Description: This hack is quick, easy and cheap!

I took an Ikea Skurar Plant Pot, 2 of them actually... and added a (moon) push light to each one. I secured a battery operated push light to the bottom of each pot with a patch of industrial strength velcro.


It was easy to hang them (upside down) as a sconce using EZ hooks, or Monkey Hooks.

Easy, inexpensive sconce lighting with no need for an electrician. Safe and easy to operate.

See more of the Skurar push light.

~ Jen

Steampunk-style Borrby display case

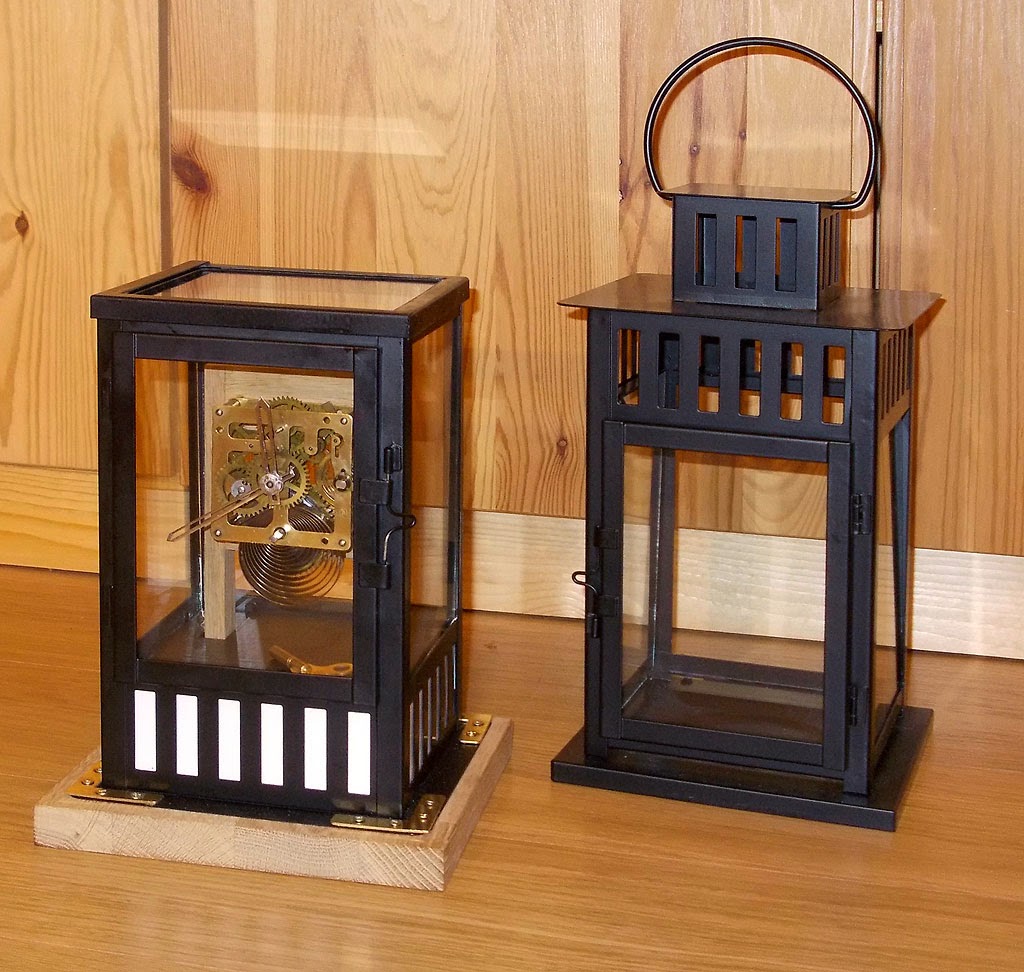
Materials: Borrby lantern, some wood and various odds and ends

Description: From another project I was left with an old and very beat-up mechanical clockwork. Because I like seeing a clockwork at work, I started looking for something that might function as a display case. The smaller Borrby lantern is inexpensive and seemed well-suited to my purpose.

Note: the galvanized version of the Borrby is constructed differently and I don't think it would work for this hack.

I bought two, because I couldn't find a single one without scratches on the glass (Hey Ikea, Borrbys are not adequately packed, they're just placed together in a box without any separation or protection between them). I ended up using 5 glass panels; one for the top as well.


First I removed all the glass panels. Then I pried off the top section of the lantern and sawed off the 4 supports flush with the bottom. I turned the lantern upside-down (so the top became the bottom). I fastened the top (now bottom) to a leftover piece of oak board - because the metal is thin and became a little deformed, I used brass L-brackets to clamp the metal down to the board (the brass echoes the clockwork metal). I was intending to put brass corners around the top too, but that didn't look like it would work out when I got to it (the screws would have ended up going through the glass).

The vent holes were covered up with leftover pieces of a LOBBO lampshade. Brass plate would have been nicer but I didn't find any.

The top cover is made of two overlapping L-shaped pieces sawn from what was originally the bottom of the lantern. These I glued together and re-painted black. The top is held in place by double-sided construction tape, In case I need to take it apart again.

I cut a glass panel to size for the top. I'm not very good at cutting glass, so starting from the panels of another Borrby limited the number of cuts I needed to make. Also, 3 chances to get it right...

My spare lantern is now missing its back glass panel, I intend to put a reflecting piece of metal in its place (perhaps cut from a cookies box) and turn it into a semi-directional lantern.


~ Eli, Belgium

Tuesday 4 June 2013

Faktum Storage Bed

Materials: Faktum (or equivalent) cabinets, Box Spring Bed (mine is Sultan Salhus), plywood, lumber for footing and inner structure, assorted tools, screws and various bits


Description: - Measure the space you have and figure out what size of cabinets to use and how to lay them out.

I used 9 Faktum cabinets in total: 4 x 80 cm wide, 1 x 60 cm wide (total width of the space was only 230 cm) and 4 x 40 cm wide, layed out as in the picture.

- Assemble all the full height cabinets. Leave the backing off one of the big ones - this will be the doorway to the storage space.


- Shorten the cabinets as needed prior to assembly. This is pretty easy to figure out when you look at the pieces, if you have prior DIY experience with tools. I'm looking into creating a tutorial for this, when I have the time...

- Lay out the cabinets. Optionally lay cabinets on a lumber footing, so they're easier to open. This also helps to attach the cabinets: you can screw them on the footing.

- Attach cabinets to each other and build an inner structure to reinforce them and to take the most of the weight of the bed and anyone laying on it.

- Optionally cover the tops of cabinets with plywood (or other material) for a sleeker look. Treat your chosen material (I waxed the plywood after sanding it fine) so it's easier to clean and will keep looking nice.

- Attach the bed on top of the structure. I used steel brackets (used them on a lot of places in the construction as well).

- Attach doors and handles. Line up the doors.

- Step back and enjoy! And then fill it up. There's more photos in my blog.

~ Nora, Espoo, Finland


Simple Lack Ottoman

Materials: Lack coffee table, Capita legs


Description: I love the new SODERHAMN ottoman, but right now is out of my budget (250 dollars for an ottoman? what?!) so I came up with this, which is basically another approach to a LACK/OTTOMAN hack you would find here, the only difference is that I used the 35" x 21" coffee table instead of the little one.

The instructions are the same as other ottoman hacks, the only difference is that I didn't use spray glue because the foam will stay in place when you staple the batting.


Costs:
Lack table $10 used from Craigslist
Capita legs $10 I was lucky enough to found them at "as is" section.
Fabric $15 (I got 1 1/2 yards, you can use the rest for cushions covers)
Foam $ 15
Batting/Dacron $ 8

Total $58

Now, if you live in US consider yourself lucky because I'm sure the material costs are cheaper than here in Canada.

~ Aurea M, Vancouver, BC, Canada

Wall-mounted charging station plus earphone/cable storage


Materials: Forhoja set of 3 boxes, electric drill with centre bit, wood glue, a few small nails, strip of 4x1 cm wood, extension lead

Description: We have in our household: 2 e-readers, 1 iPad, 1 smaller tablet computer, 1 iPhone, 2 other cell phones and a camera. All of which need to be charged ALL THE TIME. Result: We were constantly looking for charging cables, free wall sockets and the devices themselves.

So I built this charging station which can also be used to stores extra charging cables, earbuds and cell phones. I wanted a wall-mounted station so as not to clutter up the last few precious bits of free table and shelf surface.

I got the Forhoja boxes - it's a set of one big and two smaller boxes; the big one comes with a tray-like lid. The entire thing is just wide and deep enough to comfortably hold the iPad, at least to Kindles and two cell phones at the same time.


First I attached the little pieces of wood into the big box (instead of into the lid as per instructions) to prevent the lid from sliding about.

Using wood glue, I glued the smaller boxes on the sides of the big box. Originally I hadn’t planned to use the small boxes at all, but they make an excellent place to keep earbuds (which disappear all the time as well). I glued 4 strips of wood (10 x 4 x 1cm) to the back to provide a little space between box and wall and put a few small nails in for extra sturdiness.

I drilled a few 22mm ventilation holes into the lid and the bottom of the big box to prevent the charging plugs and extensions lead from overheating. (Note: don’t forget to put a piece of scrap wood under the box when drilling ventilation holes! You can also put sticky tape on the underside so the wood won’t splinter outwards when the drill breaks through.) I also drilled holes into the back for wall mounting with two screws and washers.

When I screwed the box to the wall I placed the power cable along the back of the box so it runs down the middle between the strips of wood. I had to use a manual screwdriver because the electric screwdriver wouldn’t fit â€" hard work! The cables inside the box are gathered together with a bit of plastic-coated wire so they won’t go all over the place when the lid is lifted off. The lid goes on to the box deep-side up, so the devices can be propped against the wall and won’t slip over the edge.

I'€™m pretty pleased with the whole thing; I only wish I had painted it a bright colour before screwing it to the wall - maybe I'€™ll do that at a later date when I can face having to screw it on again with the tiny manual screwdriver.

~ Nina Hyland, Munich, Germany

Terrarium From Another World

Materials: Morkt Lantern

Description: For my daughter's woodland themed room I took the Morkt Lantern and used silicone and a plastic ring to seal up the bottom. I then planted succulents and placed an AT-AT for a terrarium from another world.

~ Kaylie, Seattle